티스토리 뷰

🔎useReducer 이해하기
상태를 업데이트 할 때에는 useState를 사용해서 새로운 상태를 설정해주었습니다.
상태를 관리하게 될 때 useState를 사용하는 것 말고도 다른 방법이 있습니다.
바로, useReducer를 사용하는 것인데요.
이 Hook 함수를 사용하면 컴포넌트의 상태 업데이트 로직을 컴포넌트에서 분리시킬 수 있습니다.
상태 업데이트 로직을 컴포넌트 바깥에 작성할 수도 있고, 심지어 다른 파일에 작성 후 불러와서 사용도 가능합니다.
정리하자면, useReducer의 역할은
복잡한 상태 업데이트 로직을 컴포넌트 안에서 관리하지 말고 바깥에 따로 빼서 관리할 수 있도록 하는 것!
useReducer를 사용해 보기 전에 useState를 사용한 코드를 잠시 먼저 보겠습니다.
다음 코드는 단순히 + 버튼을 누르면 숫자가 +1되고 - 버튼을 누르면 숫자가 -1 되는 로직입니다.
import React, { useState } from 'react';

function Counter() {
  const [number, setNumber] = useState(0);

  const onIncrease = () => {
    setNumber(prevNumber => prevNumber + 1);
  };

  const onDecrease = () => {
    setNumber(prevNumber => prevNumber - 1);
  };

  return (
    <div>
      <h1>{number}</h1>
      <button onClick={onIncrease}>+1</button>
      <button onClick={onDecrease}>-1</button>
    </div>
  );
}

export default Counter;
useReducer Hook 함수를 사용해보기 전에 우선 reducer가 무엇인지 알아보겠습니다.
❓ 로직을 담고 있는 Reducer 함수
reducer는 현재 상태와 액션 객체를 파라미터로 받아와서 새로운 상태를 반환해 주는 함수입니다.
export const reducer = (state, action) => {
  // 새로운 상태를 만드는 로직

  return nextState;
}
reducer에서 반환하는 상태는 곧 컴포넌트가 지닐 새로운 상태가 됩니다.
여기서 action은 업데이트를 위한 정보를 가지고 있습니다.
주로 type 값을 지닌 객체 형태로 사용합니다.
따라서 위 코드에서 새로운 상태를 만드는 로직 부분에서 action의 type에 따라 다르게 처리하도록 로직을 작성해줍니다.
다음 코드를 봅시다.
export const reducer = (state, action) => {
  switch (action.type) {
    case 'INCREMENT':
      return state + action.count;
    case 'DECREMENT':
      return state - action.count;
    default:
      return state;
  }
}
❓ useReducer 사용법
const [state, dispatch] = useReducer(reducer, initialState);첫 번째 인자는 우리가 만든 외부에 있는 로직입니다.
두 번째 인자는 초기값입니다.
이제 useReducer의 state는 dispatch로 전달된 action의 행위로만 변경됩니다.
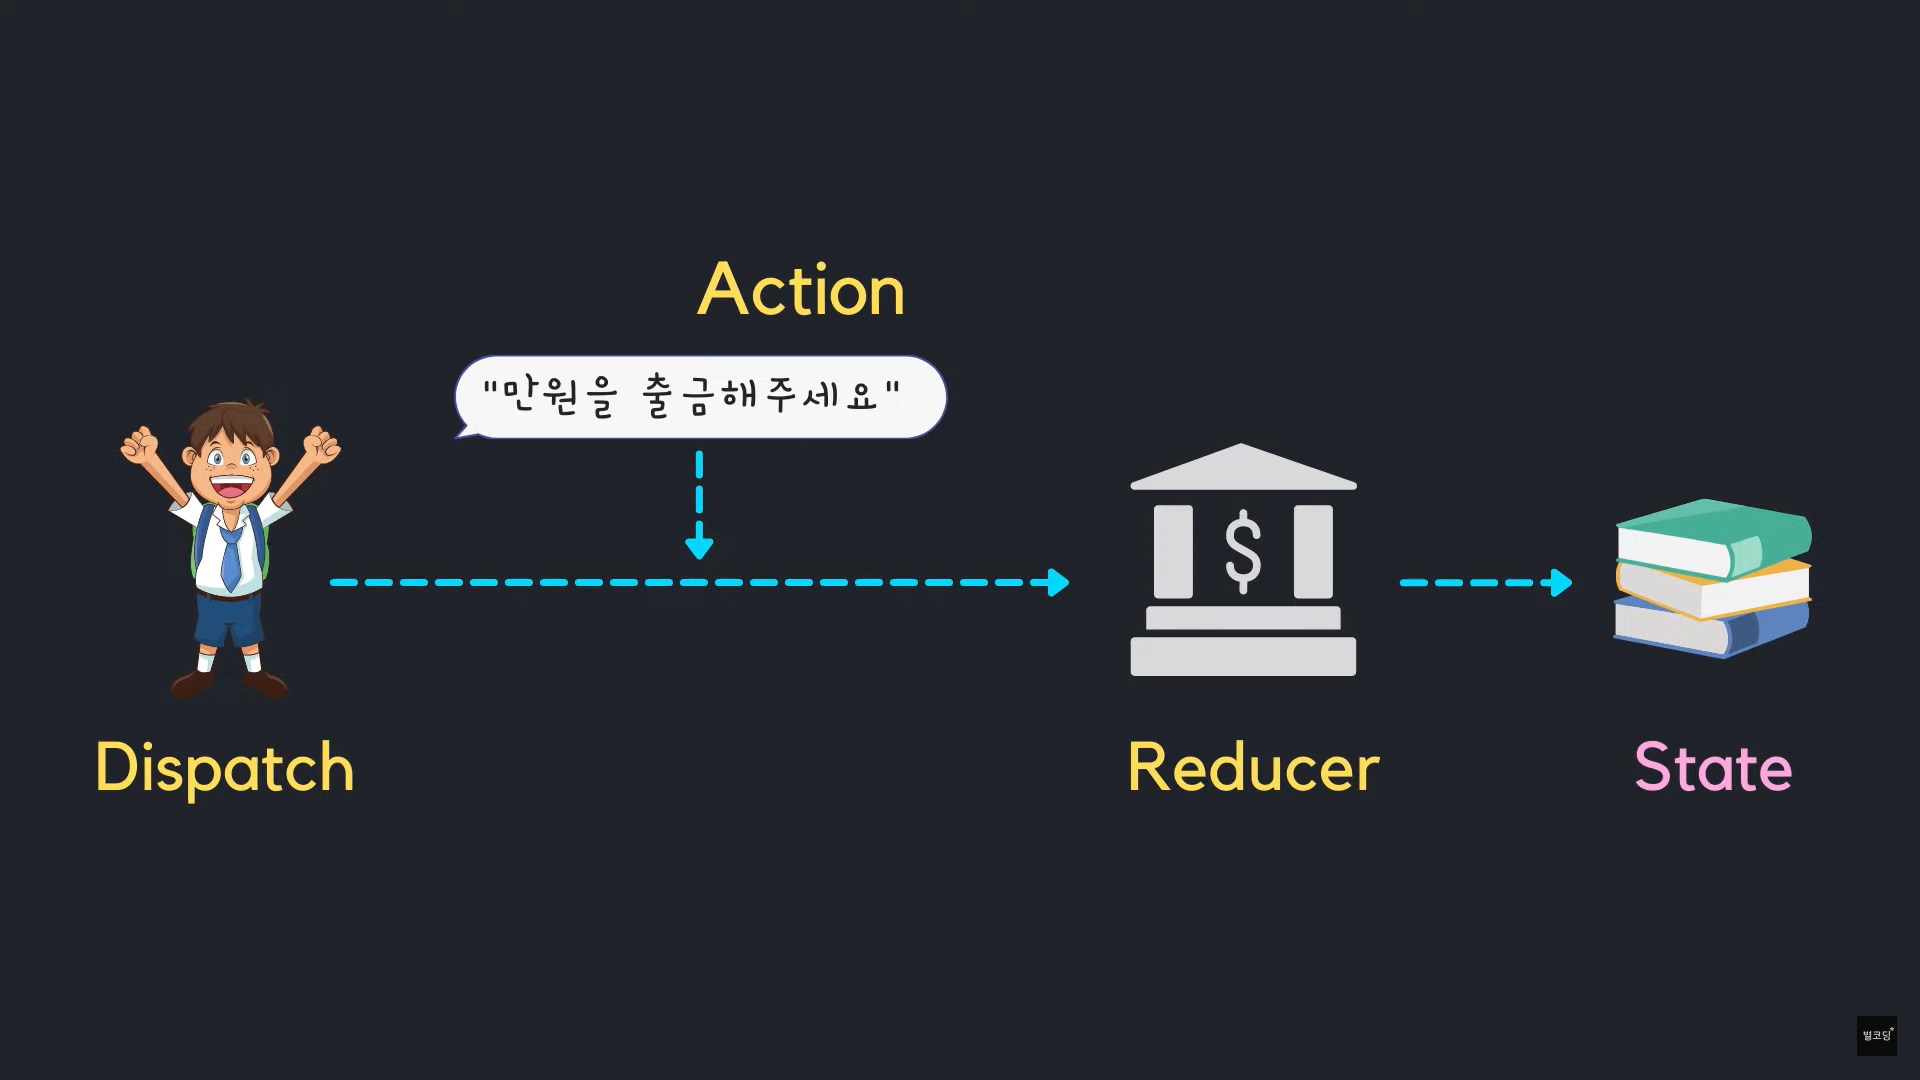
이때 dispatch는 데이터를 전달하는 함수입니다.
정확하게는 dispatch로 들어온 데이터는 reducer의 action으로 전달됩니다.
위에서 reducer에는 state와 action이 전달된다고 했었습니다.
즉, state는 reducer의 state로, dispatch 안에 작성한 데이터는 reducer의 action으로 전달되게 되는 것입니다.


철수가 거래내역이라는 state를 변경하기 위해서는 dispatch에 action이라는 내용을 넣어서 reducer에게 전달해줘야 합니다.
그러면 은행은 action의 내용대로 state를 업데이트 합니다.
철수는 은행이라는 reducer에게 또 다른 action을 보냄으로써 여러 가지 복잡한 작업을 한 줄로 작성할 수 있게 됩니다.

그럼 위에서 useState 를 사용해서 작성했던 useState를 useReducer로 구현한다면 어떻게 바뀌는지 알아봅시다.
import { useReducer } from 'react';
import { reducer } from './reducer';

function Counter() {
  const [number, dispatch] = useReducer(reducer, 0);

  const onIncrementNumber = () => {
    dispatch({
      type: 'INCREMENT',
      count: 1,
    });
  };

  const onDecrementNumber = () => {
    dispatch({
      type: 'DECREMENT',
      count: 1,
    });
  };

  return (
    <div>
      <h1>{number}</h1>
      <button onClick={onIncrementNumber}>+1</button>
      <button onClick={onDecrementNumber}>-1</button>
    </div>
  )
}
export default Counter;
📌 dispatch는 reducer를 부른다
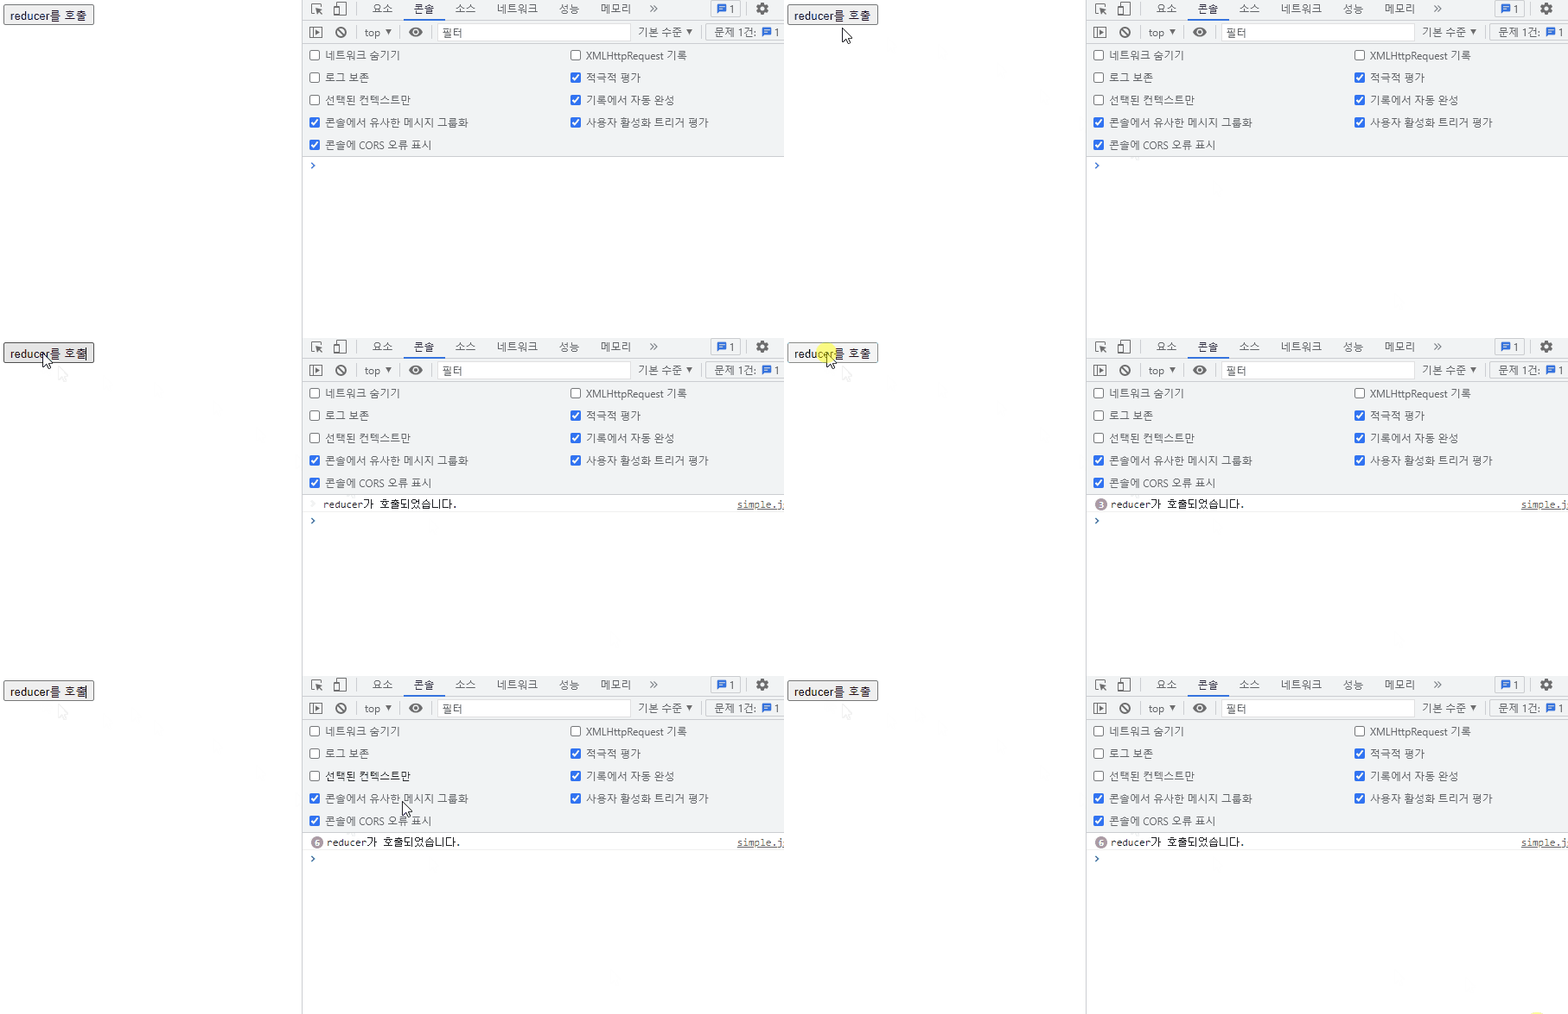
dispatch를 통해 요구를 하게 되면 reducer에서 요구에 맞게 state를 변경해준다고 했었습니다.
간단하게 말하면 dispatch를 실행하면 reducer가 호출된다는 말인데요.
실제 그런지 확인해 보겠습니다.
import {useReducer} from 'react';

const reducer = (state, action) => {
  console.log('reducer가 호출되었습니다.');
};

function Simple() {
  const [state, dispatch] = useReducer(reducer, '');
  return <button onClick={() => dispatch()}>reducer를 호출</button>;
}
export default Simple;
📌 useReducer 예제 1
다음 예제는 Reducer라는 은행에서 예금(deposit)과 출금(withdraw)을 dispatch로 요구를 보내는 예제입니다.
📄 reducer.js 파일
export const ACTION_TYPES = {
  deposit: 'deposit',
  withdraw: 'withdraw',
};

export const reducer = (state, action) => {
  console.log('reducer가 호출되었어요', state, action);

  switch (action.type) {
    case ACTION_TYPES.deposit:
      return state + action.payload;
    case ACTION_TYPES.withdraw:
      return state - action.payload;
    default:
      return state;
  }
};
상단에 ACTION_TYPES로 굳이 객체화를 해둔 이유는 switch문에서 case에 들어오는 type을 좀 더 가독성 있게 작성하고 에러를 방지하기 위해 작성했습니다.
또한 ACITON_TYPES 객체 안에서 값을 변경하면 해당 type을 사용하고 있는 모든 라인에서 한꺼번에 같이 변경되겠죠?
📄 Bank.js 파일
import {useState, useReducer} from 'react';
import {ACTION_TYPES, reducer} from './reducer/reducer';

// reducer - state를 업데이트 하는 역할 (은행)
// dispatch - state를 업데이트를 위한 요구
// action - 요구의 내용

function Bank() {
  const [number, setNumber] = useState(0);
  const [money, dispatch] = useReducer(reducer, 0);
  // money는 reducer를 통해서만 업데이트됨
  // reducer를 통해 money를 업데이트하고 싶을 때마다 dispatch를 불러줄 것임

  const onClickDeposit = () => {
    dispatch({
      type: ACTION_TYPES.deposit,
      payload: number,
    });
  };

  const onClickWithdraw = () => {
    dispatch({
      type: ACTION_TYPES.withdraw,
      payload: number,
    });
  };

  return (
    <div>
      <h2>useReducer 은행에 오신 것을 환영합니다.</h2>
      <p>잔고: {money}원</p>
      <input
        type="number"
        value={number}
        onChange={(e) => setNumber(parseInt(e.target.value))}
        step="1000"
      />

      <button onClick={onClickDeposit}>예금</button>
      <button onClick={onClickWithdraw}>출금</button>
    </div>
  );
}
export default Bank;
dispatch 안에 객체를 넣어서 보냈습니다.
그 객체 안에는 type과 payload가 있습니다.
type은 우리가 reducer에서 작성한 type을 보고 원하는 로직에 맞게 type을 보내주면 됩니다.
payload에는 주로 데이터를 넣어 보내게 되는데
위 예제에서는 input의 value를 dispatch에 넣어서 reducer에게 보낸 것이 됩니다.
만약 type이 deposit이고 payload에 3000이 들어가 있다면 reducer에서 작성한 로직을 타고 switch에서 deposit으로 빠지게 되어 state + action.payload가 되어 더해질 것입니다.

📌 useReducer 예제 2
다음 예제는 출석부 예제입니다.
input에 이름을 입력하고 추가를 누르면 아래에 이름과 삭제 버튼이 추가됩니다.
만약 추가된 이름 옆 삭제 버튼을 누르게 되면 해당 이름과 삭제 버튼이 사라지게 됩니다.
이때 추가와 삭제 기능을 reducer를 통해 구현해 보려고 합니다.
📄 reducer.js 파일
export const ACTION_TYPES = {
  add: 'add-student',
  delete: 'delete-student',
};

export const reducer = (state, action) => {

  switch (action.type) {
    case ACTION_TYPES.add:
      const name = action.payload.name;
      const newStudent = {
        id: Date.now(),
        name,
        isHere: false,
      };
      return {
        count: state.count + 1,
        students: [...state.students, newStudent],
      };
    case ACTION_TYPES.delete:
      return {
        count: state.count - 1,
        students: state.students.filter(
          (student) => student.id !== action.payload.id
        ),
      };
    default:
      return state;
  }
};
add하는 경우에는 새로운 학생정보 객체를 만들어서 기존에 있던 state의 count 값은 +1을 해주고 state의 students 배열에 추가해줍니다.
delete의 경우에는 기존 state의 count 값은 -1 해주고 students 배열은 payload를 통해 받은 id(<= 삭제하길 원하는 학생의 id)를 filter 함수를 통해 새로운 배열로 state를 업데이트 해줍니다.
다음 컴포넌트는 추가 버튼을 눌렀을 때 보여지는 학생 정보에 해당하는 컴포넌트입니다.
📄 Student.js 파일
function Student({name}) {
  return (
    <div>
      <span>{name}</span>
      <button>삭제</button>
    </div>
  );
}
export default Student;
📄 Attendance.js 파일
import {useReducer, useState} from 'react';
import {ACTION_TYPES, reducer} from './reducer/reducer';
import Student from './Student';

const initialState = {
  count: 0,
  students: [],
};

function Attendance() {
  const [name, setName] = useState('');
  const [studentInfo, dispatch] = useReducer(reducer, initialState);

  const onChangeNameInput = (e) => setName(e.target.value);

  const onClickAddNewStudent = () => {
    dispatch({
      type: ACTION_TYPES.add,
      payload: {
        name,
      },
    });
  };

  return (
    <div>
      <h1>출석부</h1>
      <p>총 학생수: {studentInfo.count}</p>
      <input
        type="text"
        placeholder="이름을 입력해주세요"
        value={name}
        onChange={onChangeNameInput}
      />
      <button onClick={onClickAddNewStudent}>추가</button>
      {studentInfo.students.map((student) => (
        <Student
          key={student.id}
          name={student.name}
          dispatch={dispatch}
          id={student.id}
        />
      ))}
    </div>
  );
}
export default Attendance;
이제 삭제 기능을 구현해야 하는데 이때 역시도 studentInfo라는 state를 변경해야 하기 때문에 이 경우에도 dispatch를 통해서 업데이트해야 합니다.
따라서 Student 컴포넌트에 인자로 dispatch를 넘겨줍니다.
📄 Student.js 파일
import {ACTION_TYPES} from './reducer/reducer';

function Student({name, dispatch, id}) {
  const onClickDeleteStudent = () => {
    dispatch({
      type: ACTION_TYPES.delete,
      payload: {id},
    });
  };

  return (
    <div>
      <span>{name}</span>
      <button onClick={onClickDeleteStudent}>삭제</button>
    </div>
  );
}
export default Student;
'프론트엔드 > React' 카테고리의 다른 글
| [React] useRedcuer & useContext 같이 사용 - state, 분리한 state 업데이트 로직을 전역에서 사용해보자 (0) | 2023.02.26 |
|---|---|
| [React] useContext로 전역 상태 관리를 하자 (0) | 2023.02.20 |
| [React] 리액트 불변성? 불변성을 지켜야 하는 이유 (0) | 2023.02.18 |
| [React] 커스텀 Hooks - 중복되는 로직을 한줄로 처리하도록 (0) | 2023.02.13 |
| [React] useCallback - 함수를 재사용하자 (0) | 2023.02.13 |
- Total
- Today
- Yesterday
- frontend
- 프론트엔드
- 디프만
- 딥러닝
- JSP
- 프론트엔드 기초
- 자바
- 파이썬
- rtl
- TypeScript
- testing
- 프론트엔드 공부
- react-query
- CSS
- 자바스크립트 기초
- 타입스크립트
- 스타일 컴포넌트 styled-components
- styled-components
- jest
- 자바스크립트
- 리액트
- next.js
- react
- HTML
- 프로젝트 회고
- 머신러닝
- 인프런
- 데이터분석
- Python
- 리액트 훅
| 일 | 월 | 화 | 수 | 목 | 금 | 토 |
|---|---|---|---|---|---|---|
| 1 | 2 | 3 | ||||
| 4 | 5 | 6 | 7 | 8 | 9 | 10 |
| 11 | 12 | 13 | 14 | 15 | 16 | 17 |
| 18 | 19 | 20 | 21 | 22 | 23 | 24 |
| 25 | 26 | 27 | 28 | 29 | 30 | 31 |
